

One of the ultimates.
The deadlift.
Without a doubt this bad boy is up there in the top three all-time greatest exercises.
Entire books have been written about it. DVD’s have been filmed. Millions of YouTube videos exist on the WWW (world wide web, for those playing at home) of it. And now, you are reading an article about it.
Excited? Well, you should be. Deadlifts are an amazing exercise to add into your program. But it’s not something you can just step up and do, unfortunately.
Well, maybe you can, but it might not be a good idea all the time.
It takes an incredible amount of overall strength, mobility and demand for your body to execute it properly, but most importantly, safely.
Fortunately for you today though, I’m going to take you through some simple steps for achieving this exercise. So simple in fact, that it will get you to a level where you’re not just picking up cardboard cut-out circles on a broomstick.

Since it is an exercise that must be “earned”, it might sound daunting at first, and in fact, there are a lot of people that think this exercise is the devil and everyone that performs them is on the path to a ruined back.
Too much negativity, if you ask me.
And the good news is no matter what level you’re at, you are able to start somewhere down the hip hinging line, and put yourself on the path to obtaining the magical (non-existent) key to this golden exercise.

NOW I’m feeling the excitement.
But what if you’re already banging out these on a regular basis? Stick around anyway. You might learn a few new cues that you can take away that will dramatically increase your lifts.
And like always, money back guaranteed.
(I can’t actually guarantee that).
Main points.
Things like carrying shopping bags (aka farmer carries), standing up (squats) and even making your nephew almost wet themselves from happiness when you push them up and hold them overhead (military press), all require a good amount of activation, foundation and stability to perform without injury or pain in hindsight.

The deadlift is no exception. And with any hip hinge movement, the movement wants to come from, yep, you guessed it, the hips.
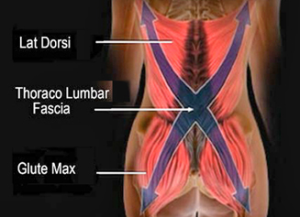
There’s no way around using most of your body (if not all) for this exercise, but some of the main muscles – and generally the most lazy and/or weak ones – are the gluteus’ and latissimus dorsi’s (glutes and lats).
Lucky for all you sleepy glutes and/or lats individuals out there, you can head to this link to read about glute activation, and here to read about creating more a stable upper body foundation.
Now with that out of the way, we can move on.
Press start.
So like always, the big thing with this exercise (if not all) is that you always want to begin by creating a solid foundation and then work up to the big exercise. Correctly making sure you progress through the stages will not only help ensure that you perform the exercise safely for years to come, but also provide you with the training response you are most likely in search for.
Which indeed makes it so much more beneficial than just “bangin’ out reps, bro”.
Right… Bro?
Anyway, regressing this movement can come in a number of different forms: from retraining hip hinge patterned exercises, like the stiff-legged deadlift, to even working on simple vertical shin squats (like we talked about last time).
Number one.
It might not seem like it at first, but mastering the stiff-legged deadlift is one of the fastest ways to earn your deadlift badge. And by learning to properly engage your core, all whilst creating movement via your hips, it will help you dominate the movement for some serious shift of weight against the Earth’s gravity.
It might look easy in the vid, but this movement can be a hard one to pull off. A lot of the time people tend to find movement through their lower back and not in the hips.
A simple trick to changing this pattern is to place something underneath your toes.
This will help you to make sure to shift your weight back, rather than trying to just move vertically down.
Mastering this movement can take time, and going further back down the line we can start at a simple TT hip extension:
Number two.
Getting past the hip hinge initiation stage of a proper hip extension with activation and a stiff-legged deadlift (which definitely can take a while for some people, so don’t stress), we can start to move more into the position that will be required for when you get to start lifting off the ground.
And a cool progression for this one is the rack pull.
Like in all these hip hinging exercises, the power comes from your hips, and not your lower back. So, keeping neutral spined throughout the movement and not arching/leaning back like you’re pregnant, will help ensure that you don’t walk around for the next 2-3 (or more) days with an annoying lower back soreness.
Yep, you know the one I’m talking about.
Number three.
There’s nothing wrong with never progressing past certain exercises as long as you’re still receiving a training response.
But this next exercise is definitely one of my all-time favourites (which I’m sure everyone that knows me already knows).
Enter: the trap bar deadlift.
It’s not only a great exercise for every training response under the sun (fat loss, muscle gain, strength, speed, etc.), but it’s also perfect for training people into a safe hip hinge pattern that don’t quite have the mobility to perform a conventional one.
With those simple three regressions, let’s get onto a couple of platinum tips to keep you safe and able to pull some decent weight off the ground.
Tip one – the jerk.
To stop this ‘jerking the bar off the ground’ movement when lifting, taking the “slack out” of the bar can help you to engage all your muscles properly before lifting.
You can do this by setting up for a normal deadlift, but before you lift it off the ground, only lift just that small portion so that the bars “slack” is taken out when it hits the plates.
You should hear a clink sound and the plates wouldn’t have even left the ground yet.
Simple, safe and easy.
Tip two – the neutral.
Like a lot of things, there’s a lot of debate for almost every argument. This tip is no exception. But by keeping a neutral head (ie. chin tucked in and not looking up), your entire neural system is able to perform more efficiently without a “kink in the hose” that you would find when cocking your head upright.
Not only that, but it will help you to gain more depth without the dreaded lower back round.
Try all of this out, and let me know below if you have an Q’s.